麻薯泡芙 Mochi Puff
麻薯泡芙可以说是最省事,最快能做好的甜品小吃之一,而且需要的食材基本上都是家里常备的,是一款非常适合用来紧急解馋,必收藏的小甜品哦!如果你喜欢泡芙或者是麻薯类的甜品,那你就来对地方了!
为什么你会喜欢这小甜品?
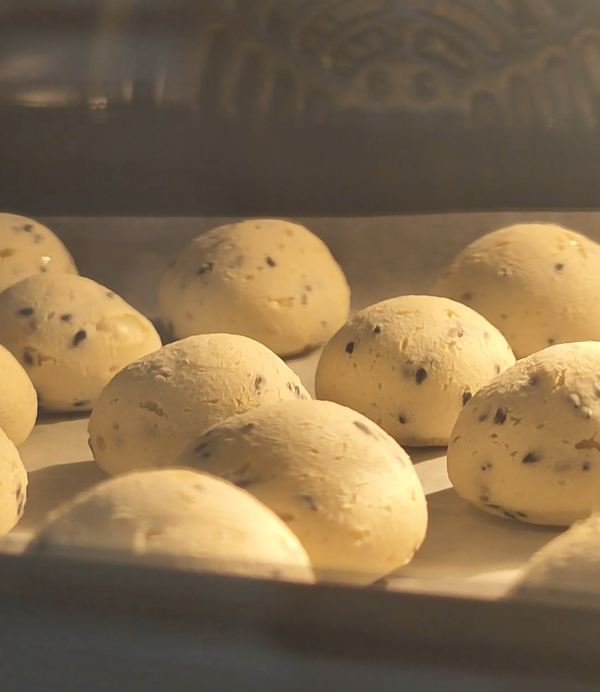
麻薯泡芙其实就是把麻薯的Q弹口感和泡芙的酥脆外壳结合在一起。外层轻轻一咬是脆壳,里面却是软糯拉丝的麻薯,口感反差很迷人。最重要的是吃起来不会太甜腻,反而有点小清新的满足感。
如果你喜欢咀嚼感和糯叽叽的弹性,麻薯泡芙绝对值得试试!而且我的食谱,不需要麻薯泡芙的预拌粉哦!不过要小心,一口一个真的很容易停不下来嘻嘻!
所需要的食材 (低于10样食材呢!)
- 25g 橄榄油/玉米油
- 20g 糖
- 125g 牛奶
- 2g 盐
- 25g 低筋面粉
- 110g 木薯粉
- 1 颗 鸡蛋
- 10g 黑芝麻
备料重点
油脂——
这食谱里的油脂其实很重要哦,它扮演的角色超级多:
- 增加柔软度:油脂能包裹淀粉和蛋白质,减少面筋的过度形成,让泡芙外壳不至于太硬,内部的麻薯也更柔韧。
- 提升风味:就像我用的橄榄油一样,给麻薯泡芙带来了像是烤佛卡夏一般的清新果香和丰富的口感,让甜品更有层次。如果你打算用牛油,那换来的就是油润的奶香!
- 帮助膨胀:在烘烤时,油脂受热会产生蒸汽并与面糊中的水分互动,帮助泡芙鼓起,形成空心结构。
- 改善口感:油脂让外壳更酥脆,内部的麻薯更Q弹,形成“外酥里糯”的对比。
- 延缓老化:油脂能延缓淀粉回生(变硬的过程),让泡芙保持较长时间的柔软和香气。
除了食谱里写的橄榄油和玉米油以外,或者黄油,葵花籽油甚至是焦化黄油都是可以作为替代的哦~ 我会用橄榄油也是因为当时我只有橄榄油,而且做出来竟然带有一丝清甜香气,也蛮好吃的呢!
鸡蛋——
这次用的鸡蛋是Size B, 去掉鸡蛋壳,一颗大约55g 左右。鸡蛋的重量其实会影响面糊的流动性和稠度,所以尽量不要差别超过5g 以上哟~ 为了预防鸡蛋突然接触到热能突然熟化,建议大家提前把鸡蛋放在室温备用,用至少不是太冷的鸡蛋来进行混合。
~ 视频教程~
料理步骤
- 把油,糖,盐和牛奶放入锅子里,中小火加热至滚开
- 放入已经过筛好的低筋面粉,混合并且持续搅拌至顺滑
- 维持中小火,放入木薯粉,混合至变成光滑的面团
- 离火,放入常温鸡蛋,搅拌至顺滑
- 再放入黑芝麻,搅拌均匀
- 把面糊装进挤花袋
- 准备一个铺上烘焙纸的烤盘
- 挤出3cm 左右大小的面糊
- (如果需要一些辅助来控制面糊的大小,可以用适合的圆形模具,沾上干面粉,再在烘焙纸上做浅浅的记号)
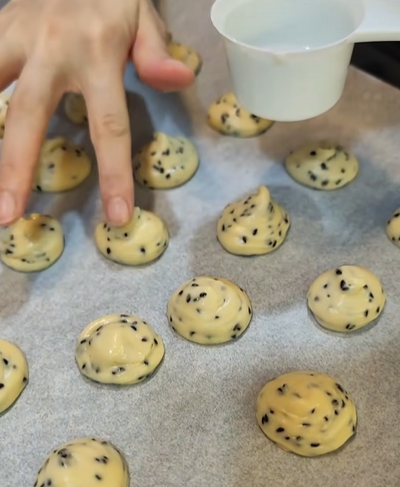
- 手指沾水,整理挤面糊产生的小尾巴
- 烤箱175C, 烤18-20分钟
- 趁热最好吃哦!
- 这泡芙可以室温储存2天,需要复热的话,可以均匀的喷点水,再烘烤个几分钟,就会跟新鲜出炉一样好吃哦!
食材 Ingredients
步骤 Method
- 把油,糖,盐和牛奶放入锅子里,中小火加热至滚开
- 放入已经过筛好的低筋面粉,混合并且持续搅拌至顺滑
- 维持中小火,放入木薯粉,混合至变成光滑的面团
- 离火,放入常温鸡蛋,搅拌至顺滑
- 再放入黑芝麻,搅拌均匀
- 把面糊装进挤花袋
- 挤出3cm 左右大小的面糊
- 手指沾水,整理面糊的小尾巴
- 烤箱175C, 烤18-20分钟
- 趁热最好吃哦!
小贴士 Tips
Mochi puffs are honestly one of the easiest and quickest desserts you can whip up—and the best part is, the ingredients are all pantry staples. It’s the perfect little treat to satisfy sudden cravings, definitely one to bookmark! If you’re a fan of cream puffs or mochi‑style sweets, you’ve come to the right place.
Original flavour Mochi Puff
Why would you love these mochi puffs?
It’s basically the perfect marriage of textures—mochi’s chewiness combined with the crisp shell of a choux puff pastry. Crunchy outside but soft and chewy inside, a contrast that’s absolutely irresistible. Best of all, it’s not overly sweet; instead, it leaves you with a refreshing kind of satisfaction.
And the best part—my recipe doesn’t rely on pre‑mixes at all. If you love something that’s both chewy and crunchy at the same time, mochi puffs are definitely worth trying! Just be careful, because they’re so addictive that once you start popping them one after another, it’s almost impossible to stop. Honestly, everyone who tries them ends up the same way!
All you need (Less than 10 items!)
- 25g Olive oil/Corn oil
- 20g Sugar
- 125g Milk
- 2g Salt
- 25g Cake flour
- 110g Tapioca starch
- 1 no Egg
- 10g Black sesame seeds
Ingredients notes
Fat ——
The fat in mochi puffs is actually crucial—it plays multiple roles:
- Adds softness: Fat coats starch and protein, reducing gluten formation so the shell doesn’t get too hard and the mochi inside stays flexible.
- Boosts flavor: Just like when I used olive oil—it gave the mochi puffs a fresh, fruity aroma reminiscent of baked focaccia, along with a richer mouthfeel that added extra layers of flavor to the dessert. Same goes if you use butter to replace it, buttery flavor will be added to the mochi puff instead!
- Helps expansion: During baking, fat interacts with moisture to create steam, helping the puff rise and form its hollow center.
- Improves texture: Fat makes the shell crispier while keeping the mochi filling bouncy, creating that “crispy outside, chewy inside” contrast.
- Slows staling: Fat delays starch retrogradation, so the puffs stay soft and aromatic longer.
Besides the olive oil and corn oil that i stated in the recipe, you can also use butter, sunflower oil, or even browned butter as substitutes. I used olive oil simply because that’s what I had on hand—and surprisingly, it gave a light, sweet fragrance that turned out delicious!
~ Video Tutorial ~
Steps of Making
- In a pot, combine oil, sugar, salt, and milk. Heat over medium‑low until it comes to a boil.
- Add sifted cake flour, mix and stir continuously until smooth.
- Keep on medium‑low heat, add tapioca flour, and stir until it forms a glossy dough.
- Remove from heat, add room‑temperature eggs, and stir until smooth.
- Mix in black sesame seeds and incorporate evenly.
- Transfer the batter into a piping bag.
- Prepare a tray that’s lined with parchment paper to prevent sticking.
- Pipe out the batter for about 3 cm in size, on a baking tray that lined with parchment paper.
- (If you need a size guideline, use a ring cutter and dip into dry flour, then mark the size on the parchement paper.)
- Make sure to leave some space within each one of them, for it to expand later.
- Wet your finger with water to smooth out the little tips of the batter.
- Bake at 175 °C for 18–20 minutes.
- Best enjoyed while warm!
- And it can be kept at room temp for 2 days, spray some water on it and refresh it by baking for a few minutes if you love it warm and crispy!
Printable Full Recipe
食材 Ingredients
步骤 Method
- In a pot, combine oil, sugar, salt, and milk. Heat over medium‑low until it comes to a boil.
- Add sifted cake flour, mix and stir continuously until smooth.
- Keep on medium‑low heat, add tapioca flour, and stir until it forms a glossy dough.
- Remove from heat, add room‑temperature eggs, and stir until smooth.
- Mix in black sesame seeds evenly.
- Transfer the batter into a piping bag.
- Pipe out the batter for about 3 cm in size.
- Wet your finger with water to smooth out the little tips of the batter.
- Bake at 175 °C for 18–20 minutes.
- Best enjoyed while warm!